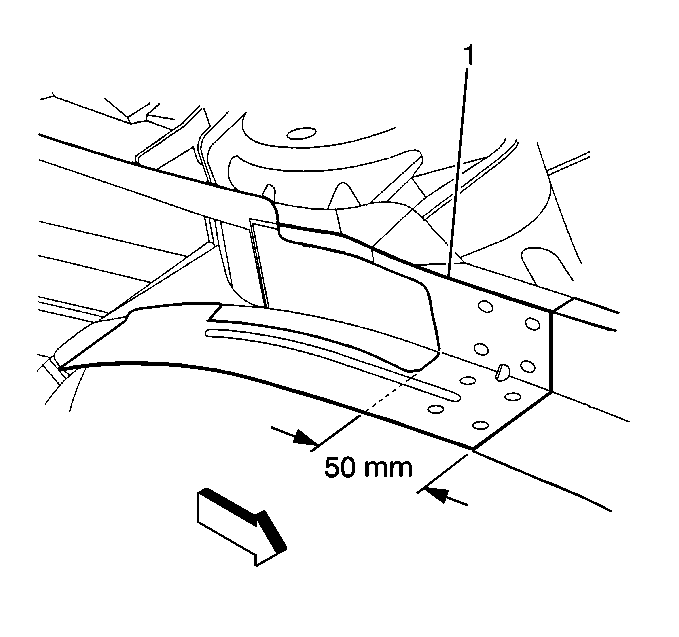
Upper Rail Inner Panel Sectioning
Important: With the outer rail panel removed, the upper rail inner panel can be replaced at the factory seams, or sectioned just in front of the cowl panel extension.
- To section the upper rail inner panel:
- Create a 50 mm (2 in) overlap just in front of the strut tower (1).
- Measure 50 mm (2 in) forward from the cowl panel extension and mark a line.
- Cut the damaged rail square to the vehicle.
- Drill 8 mm (5/16 in) holes for plug welding.
- Prepare all mating surfaces for welding as necessary.
- Apply 3M Weld-Thru Coating P/N 05916 or equivalent to all mating surfaces.
- Cut the service rail long enough to overlap the remaining portion of the original rail 50 mm (2 in).
- Position the service rail under the remaining portion of the original rail to create a 50 mm (2 in) overlap.
- Check for proper fit and plug weld as necessary.
Front Fender Mounting Bracket
The fender brackets are formed and pierced during vehicle assembly (1). The service parts are pre-drilled and will need to be located and shimmed using three-dimensional measuring equipment.
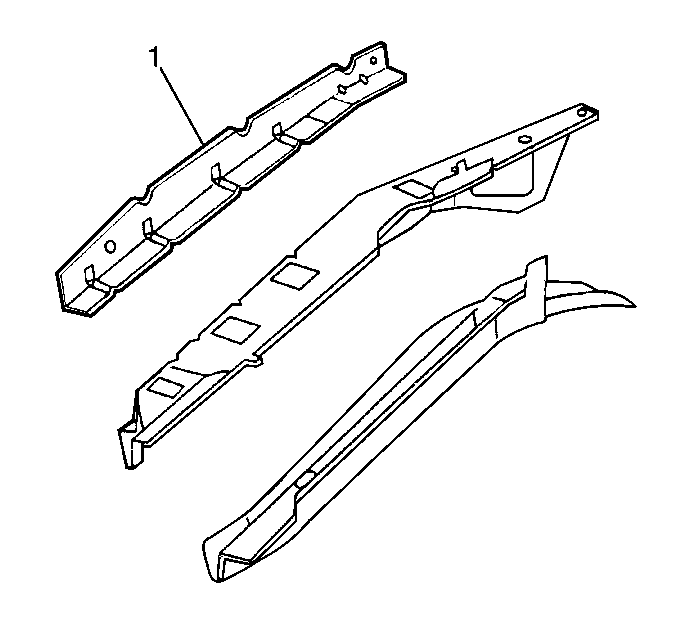
Upper Rail Replacement
Important: Complete upper rail inner panel replacement: There are a number of welds attaching the rear of the upper inner rail to the cowl panel extension and the strut tower cap. These welds can be accessed with the outer panels removed. Due to limited access for welding, care must be taken when deciding the side of the panel from which to drill.
Removal Procedure
- Remove panels and components as necessary for access.
- Restore as much of the damage as possible to the factory specifications.
- Remove all sealers and anti-corrosion materials as necessary.
- Locate, mark, and drill out all factory welds attaching the upper rail outer panel. (Note the number of welds for installation of the service panel).
- Remove the damaged upper rail assembly.
Installation Procedure
- Check for proper fit of the upper rail service panels.
- Drill 8 mm (5/16 in) holes in the service panels for plug welding at the locations noted from the original panels.
- Prepare all mating surfaces for welding as necessary.
- Apply 3M Weld-Thru Coating P/N 05916 or equivalent to all mating surfaces.
- Check the position of the front fender mounting bracket location using three-dimensional measuring equipment.
- Plug weld the front fender mounting bracket as necessary.
- Install the upper tie-bar top panels to the upper rail assembly and the radiator support assembly (1).
- Plug weld as necessary.
- Clean and prepare all bare metal surfaces.
- Install all the panels and components previously removed for access.

Apply the following as necessary:
| • | Sealers and anti-corrosion materials. |
| • | Two-part catalyzed primer. |
| • | Top-coat. |
Important: Do not combine paint systems. Refer to paint manufacturer's recommendations.
