Fuel Filter Element Replacement for Chevrolet Chevrolet C-Series Medium Duty Truck B7 1998
Removal Procedure
Important: This procedure covers both the primary and secondary filters. The primary (coarse) and the secondary (fine) filter elements are not interchangeable.
- Remove the fuel tank filler cap.
- Open the air bleed valve on the fuel manager/filter header assembly in order to release any pressure in the fuel supply system.
- Remove water in fuel senor connector at bottom of filter.
- Drain the filter by attaching a flexible tube or hose (1/4 to 5/16 in. ID) to the water drain valve.
- Slowly open the water drain valve (the drain does not have to be totally removed for fuel to drain) and drain fuel in a suitable container.
- Turning the filter locking ring in a counterclockwise direction. If unable to turn by hand, use a strap wrench (oil filter type) in order to break the element nut loose.
- Remove the element by pulling straight down.
- Remove the Water In Fuel Sensor from the old element.


Installation Procedure
Important: The new element is not equipped with a water in fuel sensor, only a plug. The water in fuel sensor/valve must be removed form the old element. Use the seal (attached to the plug in the new filter) to replace the old seal on the water in fuel sensor/valve.
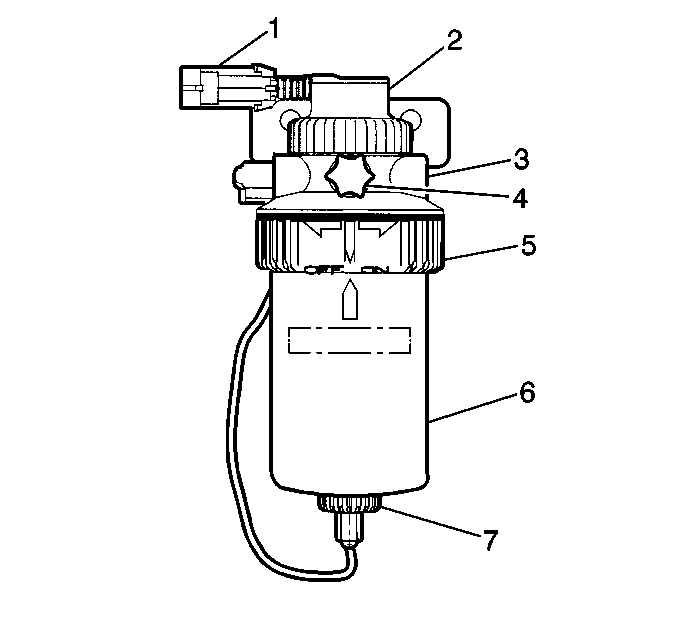
Make sure that the mating surface between the filter and the filter housing is clean before installation.- Install water in fuel sensor/valve (7) with a new seal.
- Install the new element (6) by aligning the arrow on the element to the air bleed drain valve (4) on header assembly (3).
- Push the element in a upward direction until the mating surfaces make contact.
- Align the locking ring (5) on the filter header assembly.
- Install the connector on the water in fuel sensor/valve.
- Reinstall the fuel tank filler cap.
- Bleed the air from both primary and secondary fuel manager/filter. Refer to Fuel Feed Pipe and Return Pipe Purging .
Notice: Use the correct fastener in the correct location. Replacement fasteners must be the correct part number for that application. Fasteners requiring replacement or fasteners requiring the use of thread locking compound or sealant are identified in the service procedure. Do not use paints, lubricants, or corrosion inhibitors on fasteners or fastener joint surfaces unless specified. These coatings affect fastener torque and joint clamping force and may damage the fastener. Use the correct tightening sequence and specifications when installing fasteners in order to avoid damage to parts and systems.
Tighten
Tighten the locking ring securely by hand. A "click" noise
will be herd (arrow on the locking ring will be aligned with the arrow on
the element) when the locking ring is fully torque.
