Evaporative Emission Canister Replacement for Chevrolet Chevrolet C-Series Medium Duty Truck B7 2001
Evaporative Emission Canister Replacement w/RPO NH9, NL9, or NYB
Removal Procedure
- Raise the vehicle. Refer to Lifting and Jacking the Vehicle in General Information.
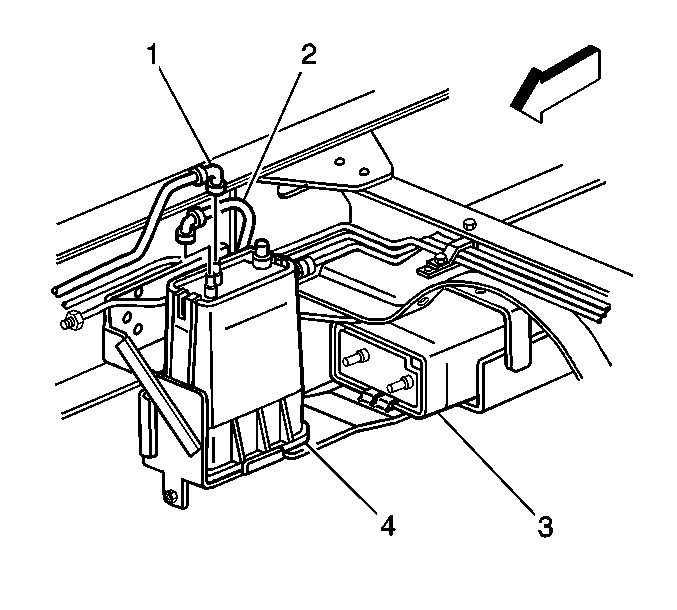
- Disconnect the EVAP purge pipe (1) and EVAP vapor pipe (2) from the front EVAP canister (4).
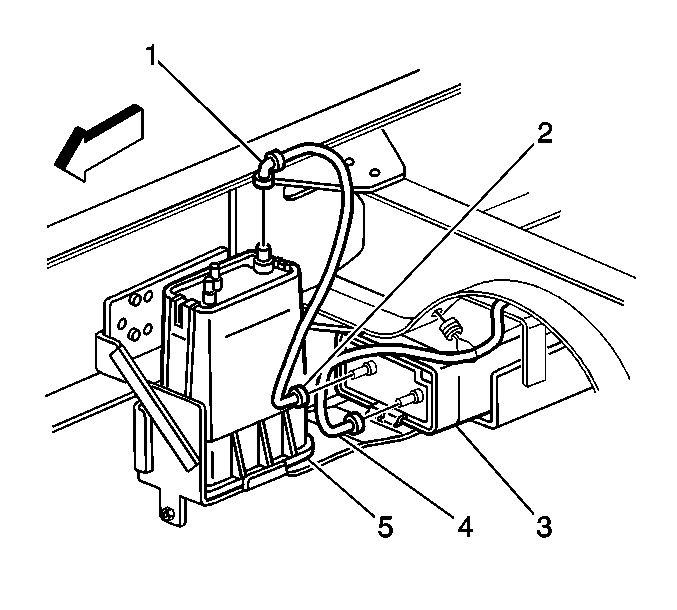
- Disconnect the EVAP vent pipe connector (1) from the front EVAP canister (5).
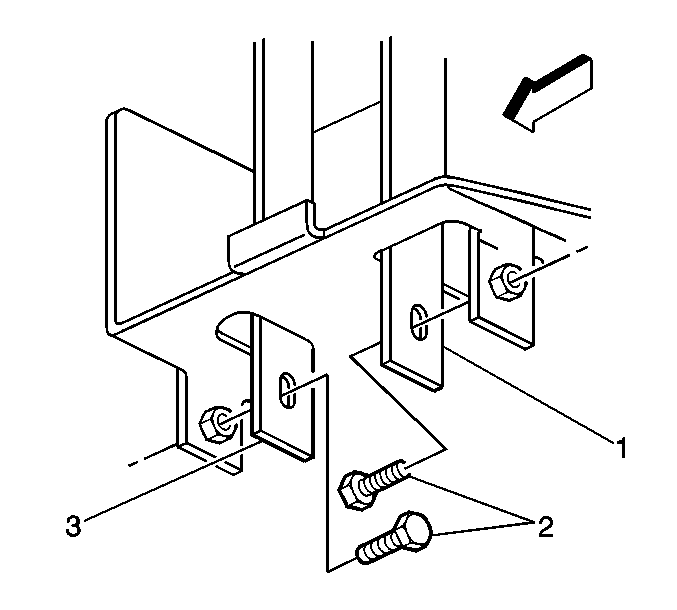
- Remove the bolts (2) from the EVAP canister brackets (1 and 3).
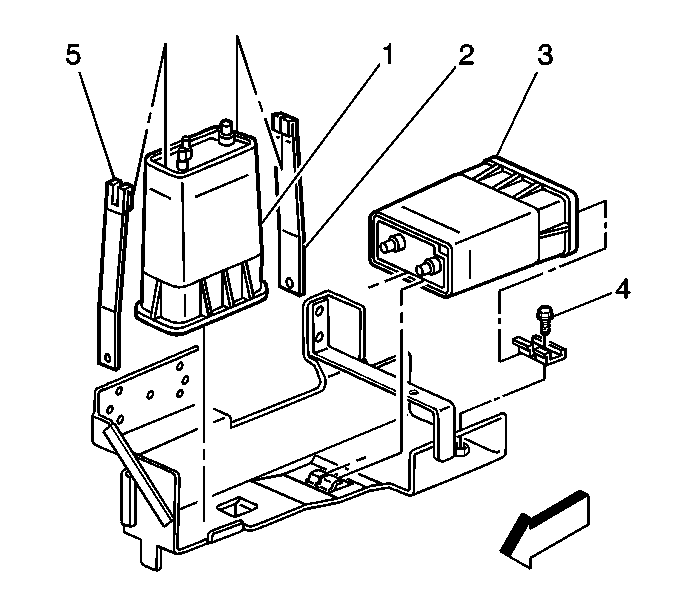
- Remove the EVAP canister brackets (2, 5) and front EVAP canister (1).
Important: Vehicles equipped with RPO NL9 will NOT have a rear EVAP canister.
Installation Procedure
- Position the EVAP canister brackets (2, 5) and front EVAP canister (1) on the EVAP canister support.
- Install the bolts (2) to the EVAP canister brackets (1, 3).
- Connect the EVAP vent pipe connector (1) to the front EVAP canister (5).
- Connect the EVAP purge pipe (1) and EVAP vapor pipe (2) to the front EVAP canister (4).
- Lower the vehicle.
Notice: Use the correct fastener in the correct location. Replacement fasteners must be the correct part number for that application. Fasteners requiring replacement or fasteners requiring the use of thread locking compound or sealant are identified in the service procedure. Do not use paints, lubricants, or corrosion inhibitors on fasteners or fastener joint surfaces unless specified. These coatings affect fastener torque and joint clamping force and may damage the fastener. Use the correct tightening sequence and specifications when installing fasteners in order to avoid damage to parts and systems.
Tighten
Tighten the EVAP canister retaining bolts to 22.5 N·m (17 lb ft).
Evaporative Emission Canister Replacement wo/RPO NL9
Removal Procedure
- Raise the vehicle. Refer to Lifting and Jacking the Vehicle in General Information.
- Disconnect the EVAP vent pipes (2, 4) from the rear EVAP canister (3).
- Remove the EVAP canister retaining bolt (4) and hold down.
- Remove the EVAP canister (3) from the EVAP canister support bracket.
Installation Procedure
- Slide the EVAP canister (3) into the tang on the EVAP canister support bracket.
- Install the EVAP canister hold down and retaining bolt (4).
- Connect the EVAP vent pipes (2 and 4) to the rear EVAP canister (3).
- Lower the vehicle.
Notice: Use the correct fastener in the correct location. Replacement fasteners must be the correct part number for that application. Fasteners requiring replacement or fasteners requiring the use of thread locking compound or sealant are identified in the service procedure. Do not use paints, lubricants, or corrosion inhibitors on fasteners or fastener joint surfaces unless specified. These coatings affect fastener torque and joint clamping force and may damage the fastener. Use the correct tightening sequence and specifications when installing fasteners in order to avoid damage to parts and systems.
Tighten
Tighten the EVAP canister retaining bolts to 22.5 N·m (17 lb ft).
